

Drive the board's RGB LED from a dashboard
Add three commands to your own firmware, update the board over the air, and switch, dim and colour its on-board LED from a phone dashboard through a flow
The ESP32-C6-Zero has a small RGB LED (a WS2812, on GPIO8) next to its USB connector. In this tutorial you light it from the phone dashboard of See a room's temperature on a dashboard: on and off, brightness and colour.
In PNeX a dashboard never drives a board directly. A press on the card writes a control. A flow listens to it and sends the value to the board. The board runs your code, so it decides what a "colour" means.
Nothing to wire: the LED is already on the board.
Add three commands to the firmware
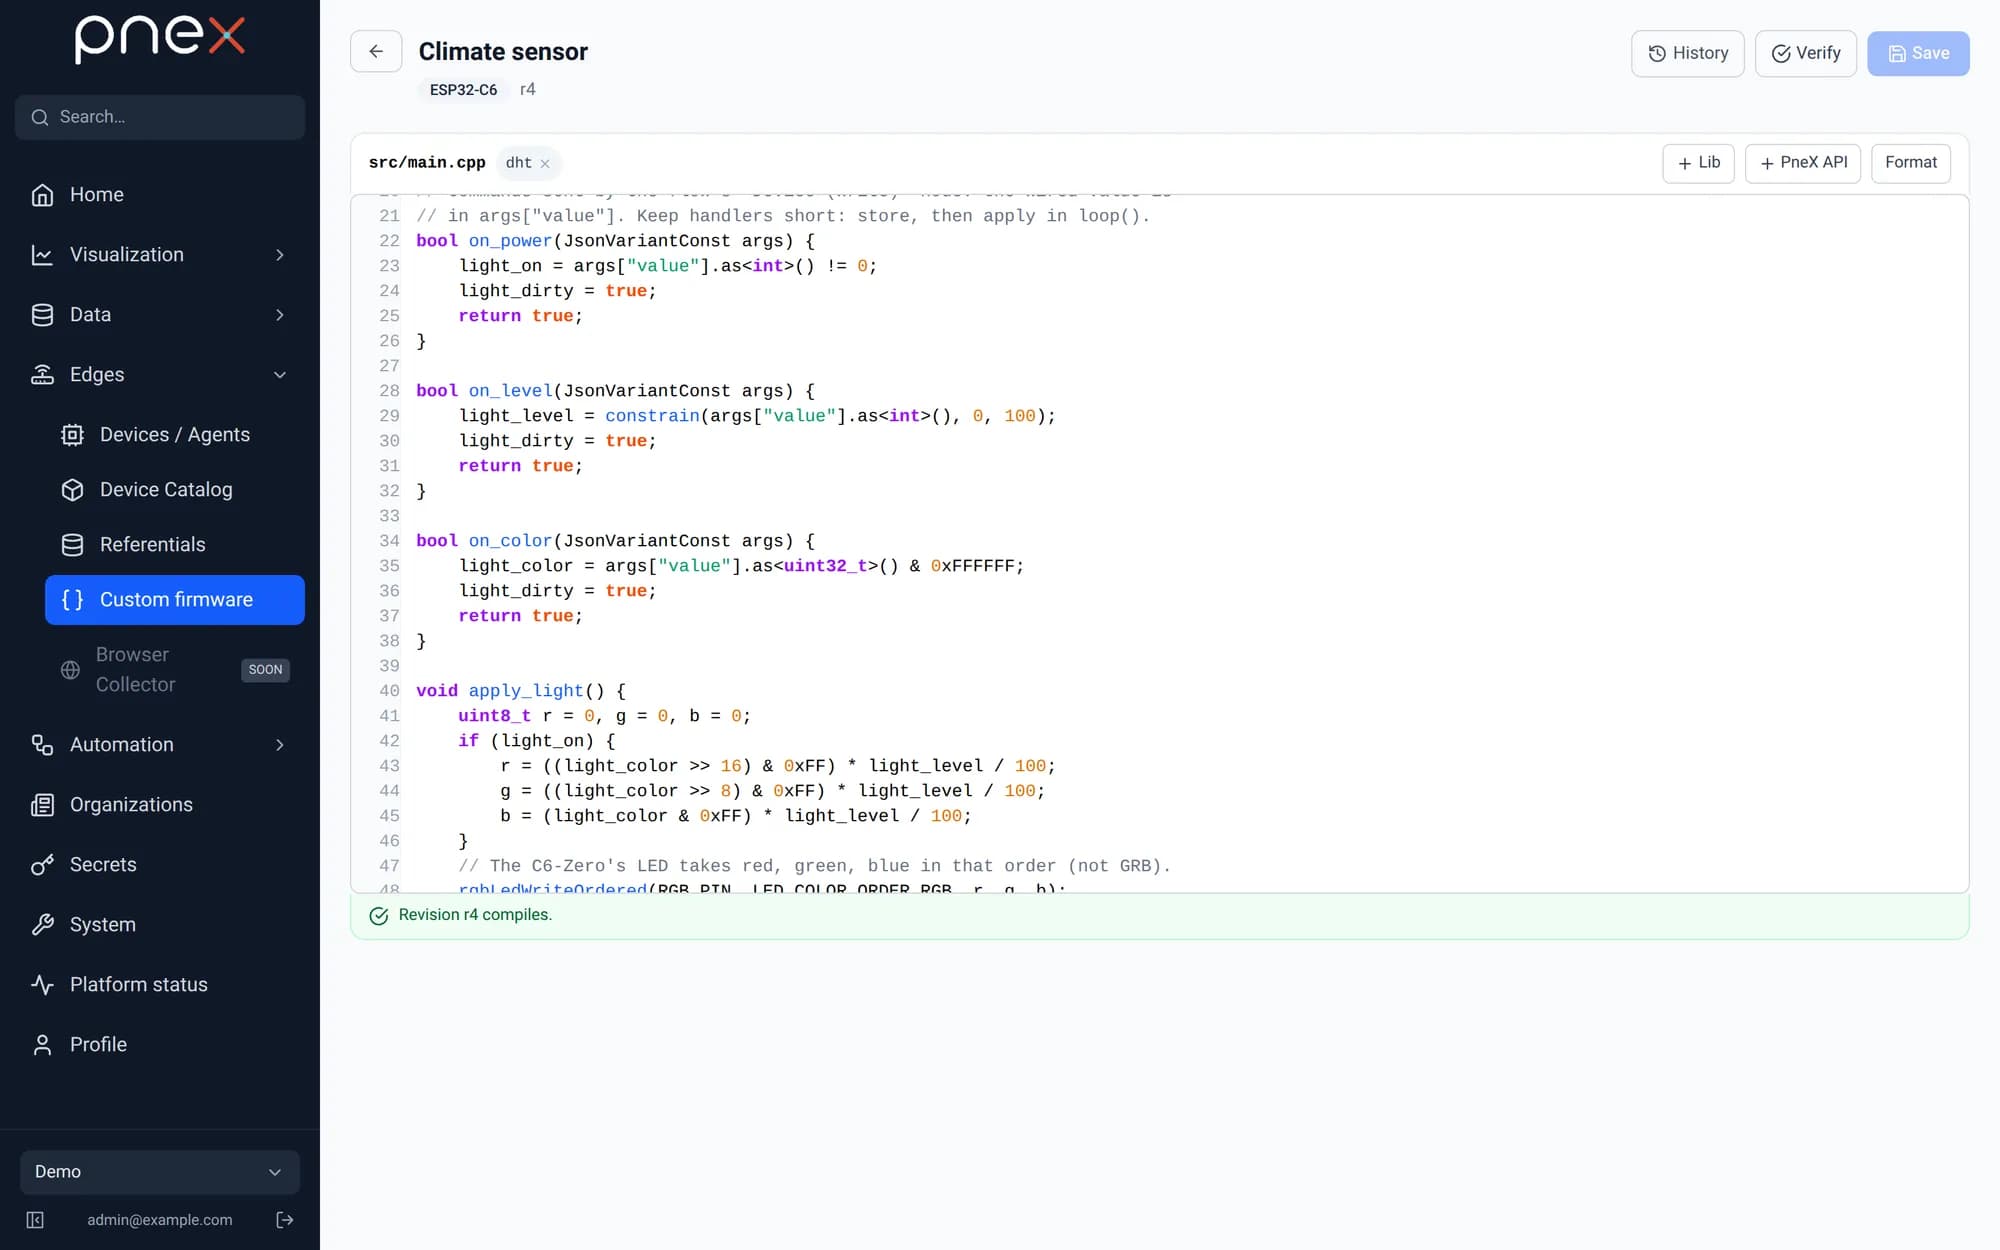
Open Edges → Custom firmware, project Climate sensor. Replace the whole sketch with this one: the sensor part is unchanged, the light part is new.
// Climate sensor + RGB light: AM2301 (DHT21) and the on-board WS2812 LED
// of a Waveshare ESP32-C6-Zero.
// WiFi, device token and encryption key are injected by PneX at build time.
#include <Pnex.h>
#include <DHT.h>

#define DHT_PIN 0        // GP0, yellow wire
#define DHT_TYPE DHT21   // AM2301 = DHT21
#define RGB_PIN 8        // on-board WS2812 LED (do not use GPIO8 for anything else)

PnexDevice pnex;
DHT dht(DHT_PIN, DHT_TYPE);

// Light state, changed by the commands, applied in loop().
bool light_on = false;
int light_level = 100;             // brightness, 0..100 %
uint32_t light_color = 0xFFFFFF;   // 0xRRGGBB
bool light_dirty = true;

// Commands sent by the flow's "Device (write)" node: the wired value is
// in args["value"]. Keep handlers short: store, then apply in loop().
bool on_power(JsonVariantConst args) {
    light_on = args["value"].as<int>() != 0;
    light_dirty = true;
    return true;
}

bool on_level(JsonVariantConst args) {
    light_level = constrain(args["value"].as<int>(), 0, 100);
    light_dirty = true;
    return true;
}

bool on_color(JsonVariantConst args) {
    light_color = args["value"].as<uint32_t>() & 0xFFFFFF;
    light_dirty = true;
    return true;
}

void apply_light() {
    uint8_t r = 0, g = 0, b = 0;
    if (light_on) {
        r = ((light_color >> 16) & 0xFF) * light_level / 100;
        g = ((light_color >> 8) & 0xFF) * light_level / 100;
        b = (light_color & 0xFF) * light_level / 100;
    }
    // The C6-Zero's LED takes red, green, blue in that order (not GRB).
    rgbLedWriteOrdered(RGB_PIN, LED_COLOR_ORDER_RGB, r, g, b);
    pnex.publish("light", light_on ? 1 : 0);  // actual state, for the card
}

void setup() {
    Serial.begin(115200);
    dht.begin();

    // Each metric becomes a telemetry series of this device.
    pnex.addMetric("temperature", "°C");
    pnex.addMetric("humidity", "%");
    pnex.addMetric("light");

    // Each command shows up in the flow's "Device (write)" node.
    pnex.onCommand("power", on_power);
    pnex.onCommand("level", on_level);
    pnex.onCommand("color", on_color);

    pnex.begin();  // WiFi + connection to your PneX server
}

unsigned long last_read_ms = 0;

void loop() {
    pnex.loop();  // call it on every iteration, never block with long delays

    if (light_dirty) {
        light_dirty = false;
        apply_light();
    }

    // The AM2301 needs at least 2 s between two reads: read every 10 s.
    if (millis() - last_read_ms >= 10000) {
        last_read_ms = millis();
        pnex.publish("light", light_on ? 1 : 0);
        float t = dht.readTemperature();
        float h = dht.readHumidity();
        if (isnan(t) || isnan(h)) {
            Serial.println("[APP] AM2301 read failed (check wiring)");
            return;
        }
        pnex.publish("temperature", t);
        pnex.publish("humidity", h);
        Serial.printf("[APP] %.1f °C  %.1f %%\n", t, h);
    }
}
Three things to notice:
pnex.onCommand("color", on_color)declares a command. The board announces it to the server, and it then shows up in your flows.- The value sent by the flow is in
args["value"]. A colour arrives as one number,0xRRGGBB(red =16711680). - A handler only stores the value. The LED is written in
loop(), so the connection is never held up.
No extra library is needed: rgbLedWriteOrdered is part of the ESP32 Arduino core.
Click Save and verify.
Update the board over the air
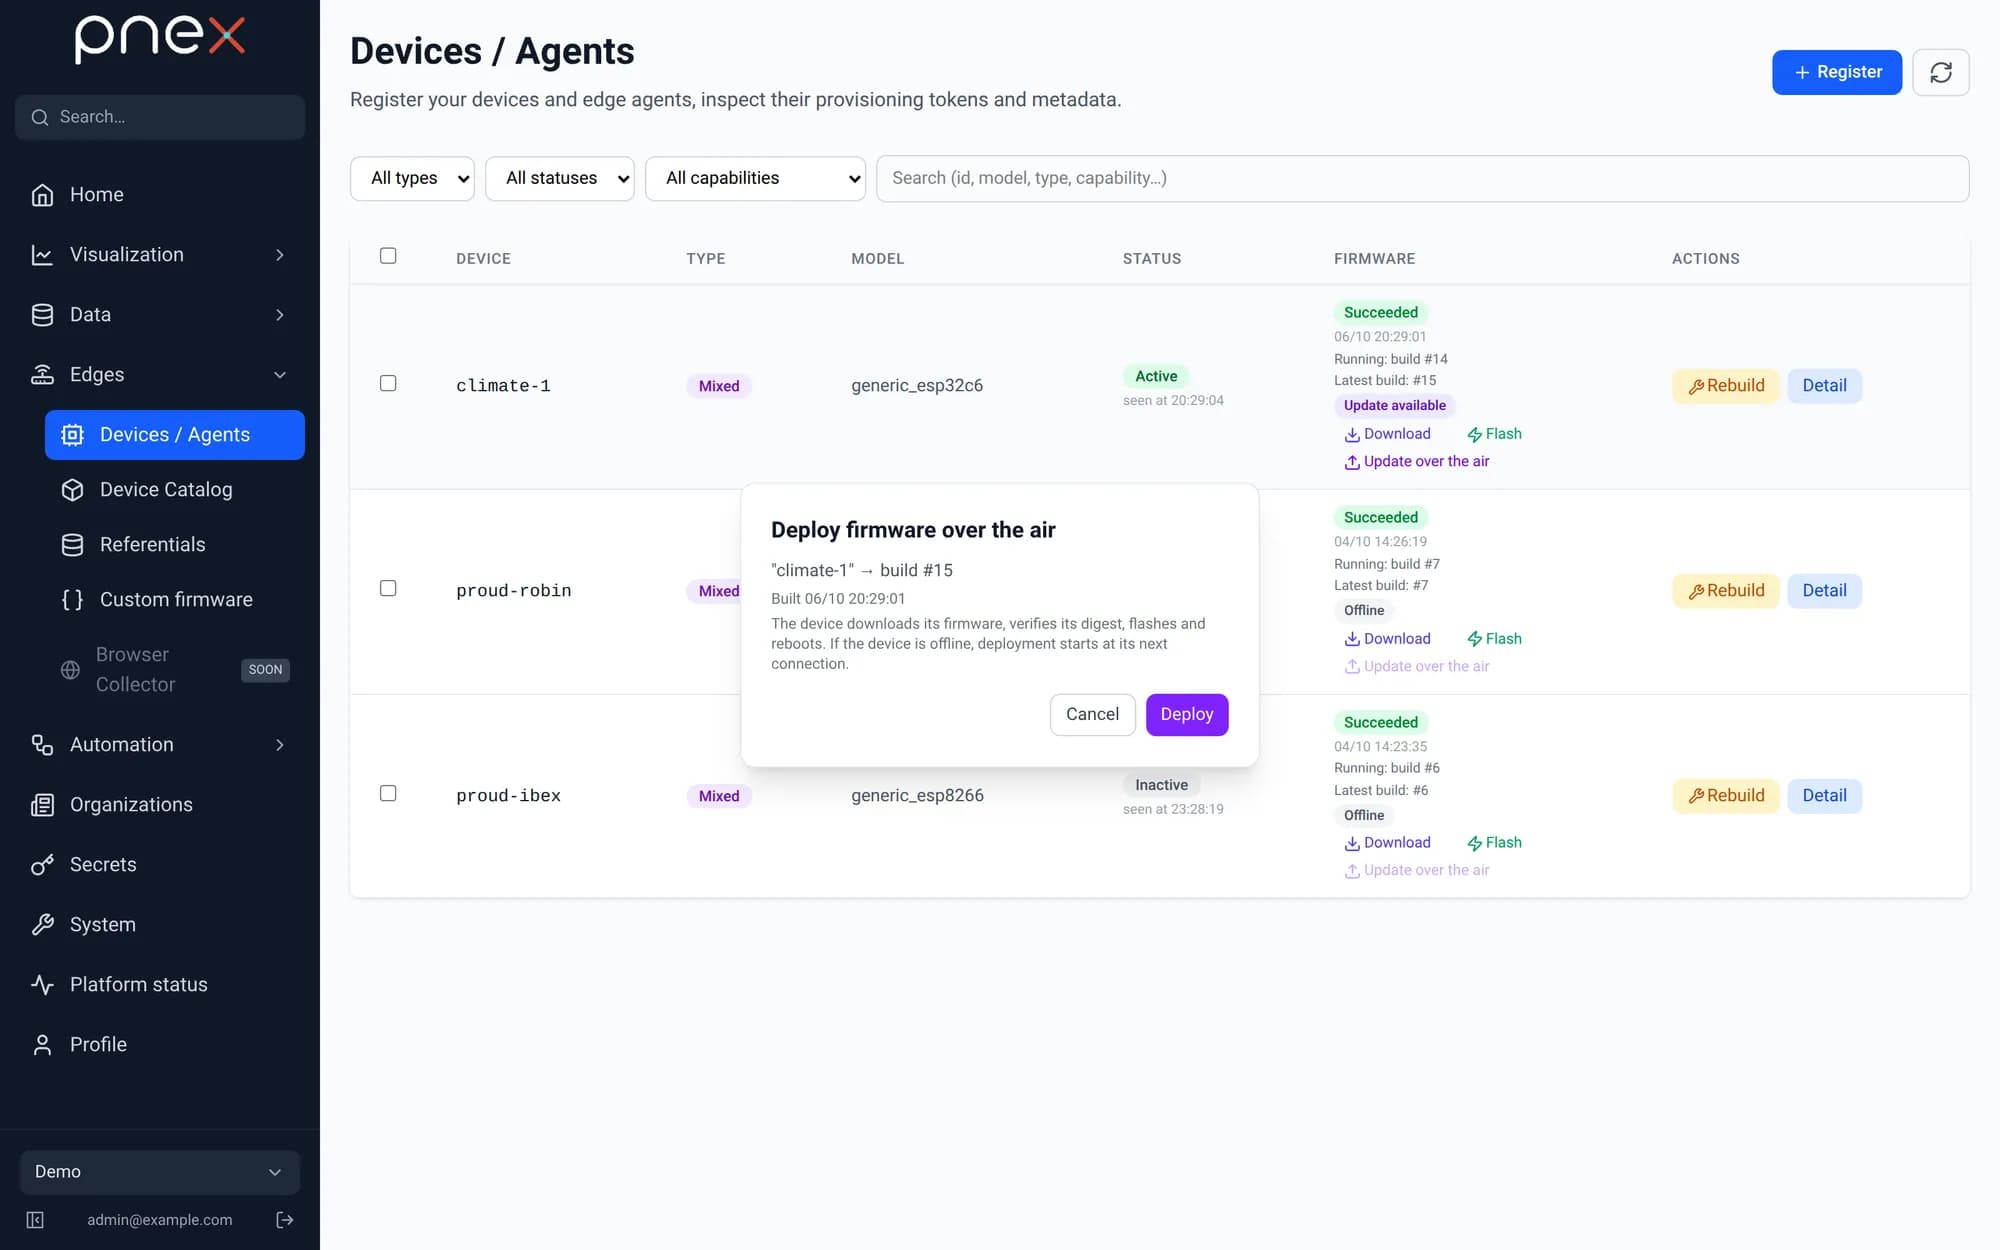
Open Edges → Devices / Agents, row climate-1:
- Rebuild: the server compiles the new revision for this board;
- Update over the air → Deploy: the board downloads it, checks it, flashes and restarts. No USB cable.
The board comes back after about 30 seconds.
climate-1 is connected again, with the new firmware version.Give the Bedroom lamp a colour
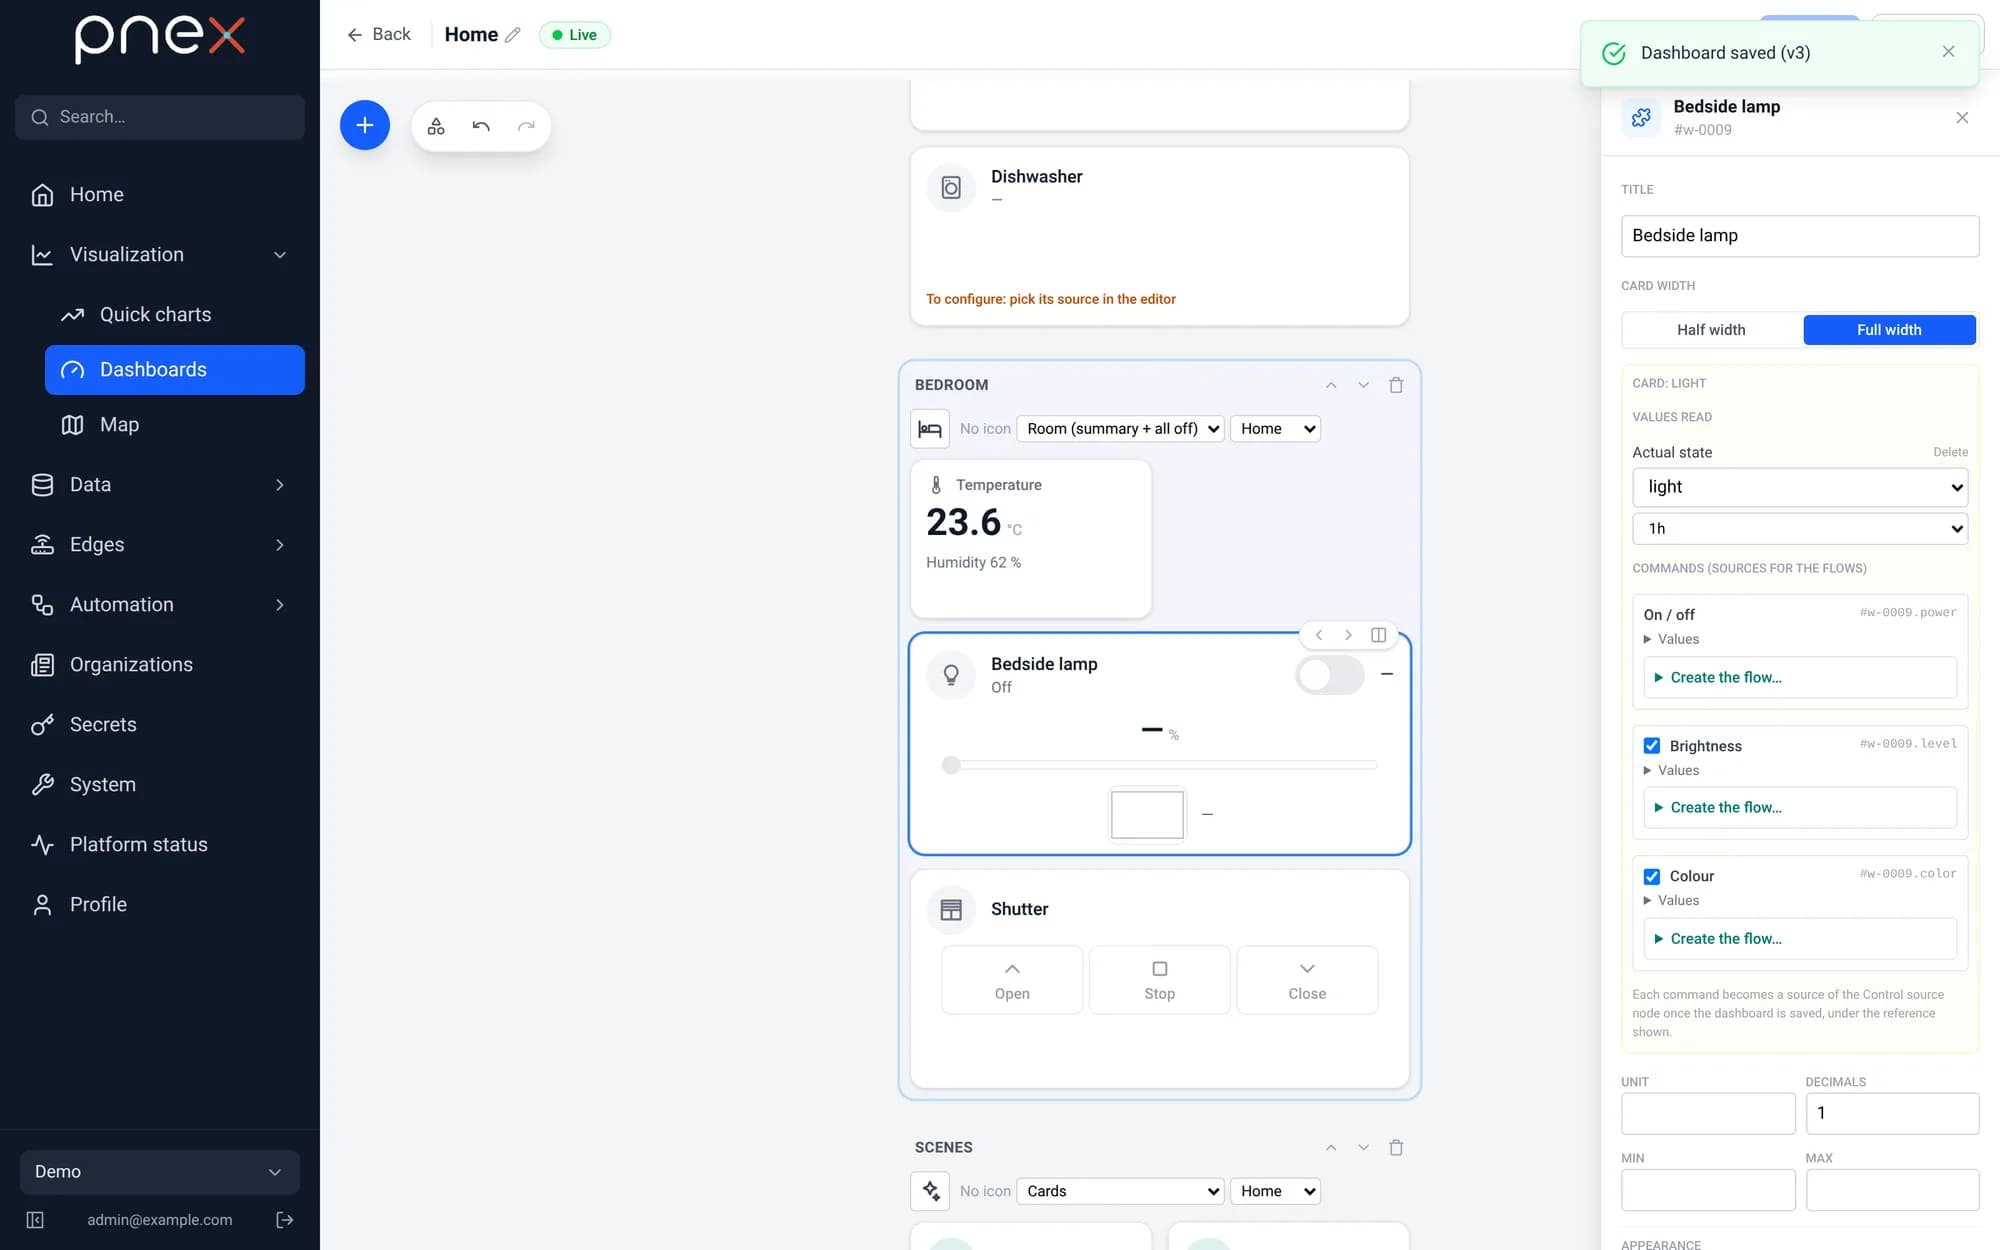
Open the Home dashboard and click Edit. The Bedroom of the Home template already has
a Bedside lamp card: click it. In the inspector:
- Commands (sources for the flows): On / off is always there. Tick Brightness and Colour;
- Values read → Actual state:
lightunderclimate-1, the state the firmware reports.
Click Save. Each command becomes a control with a reference such as
#w-0009.color. Data → Controls lists them with a No effect badge: no flow
listens to them yet.
Listen to the three controls
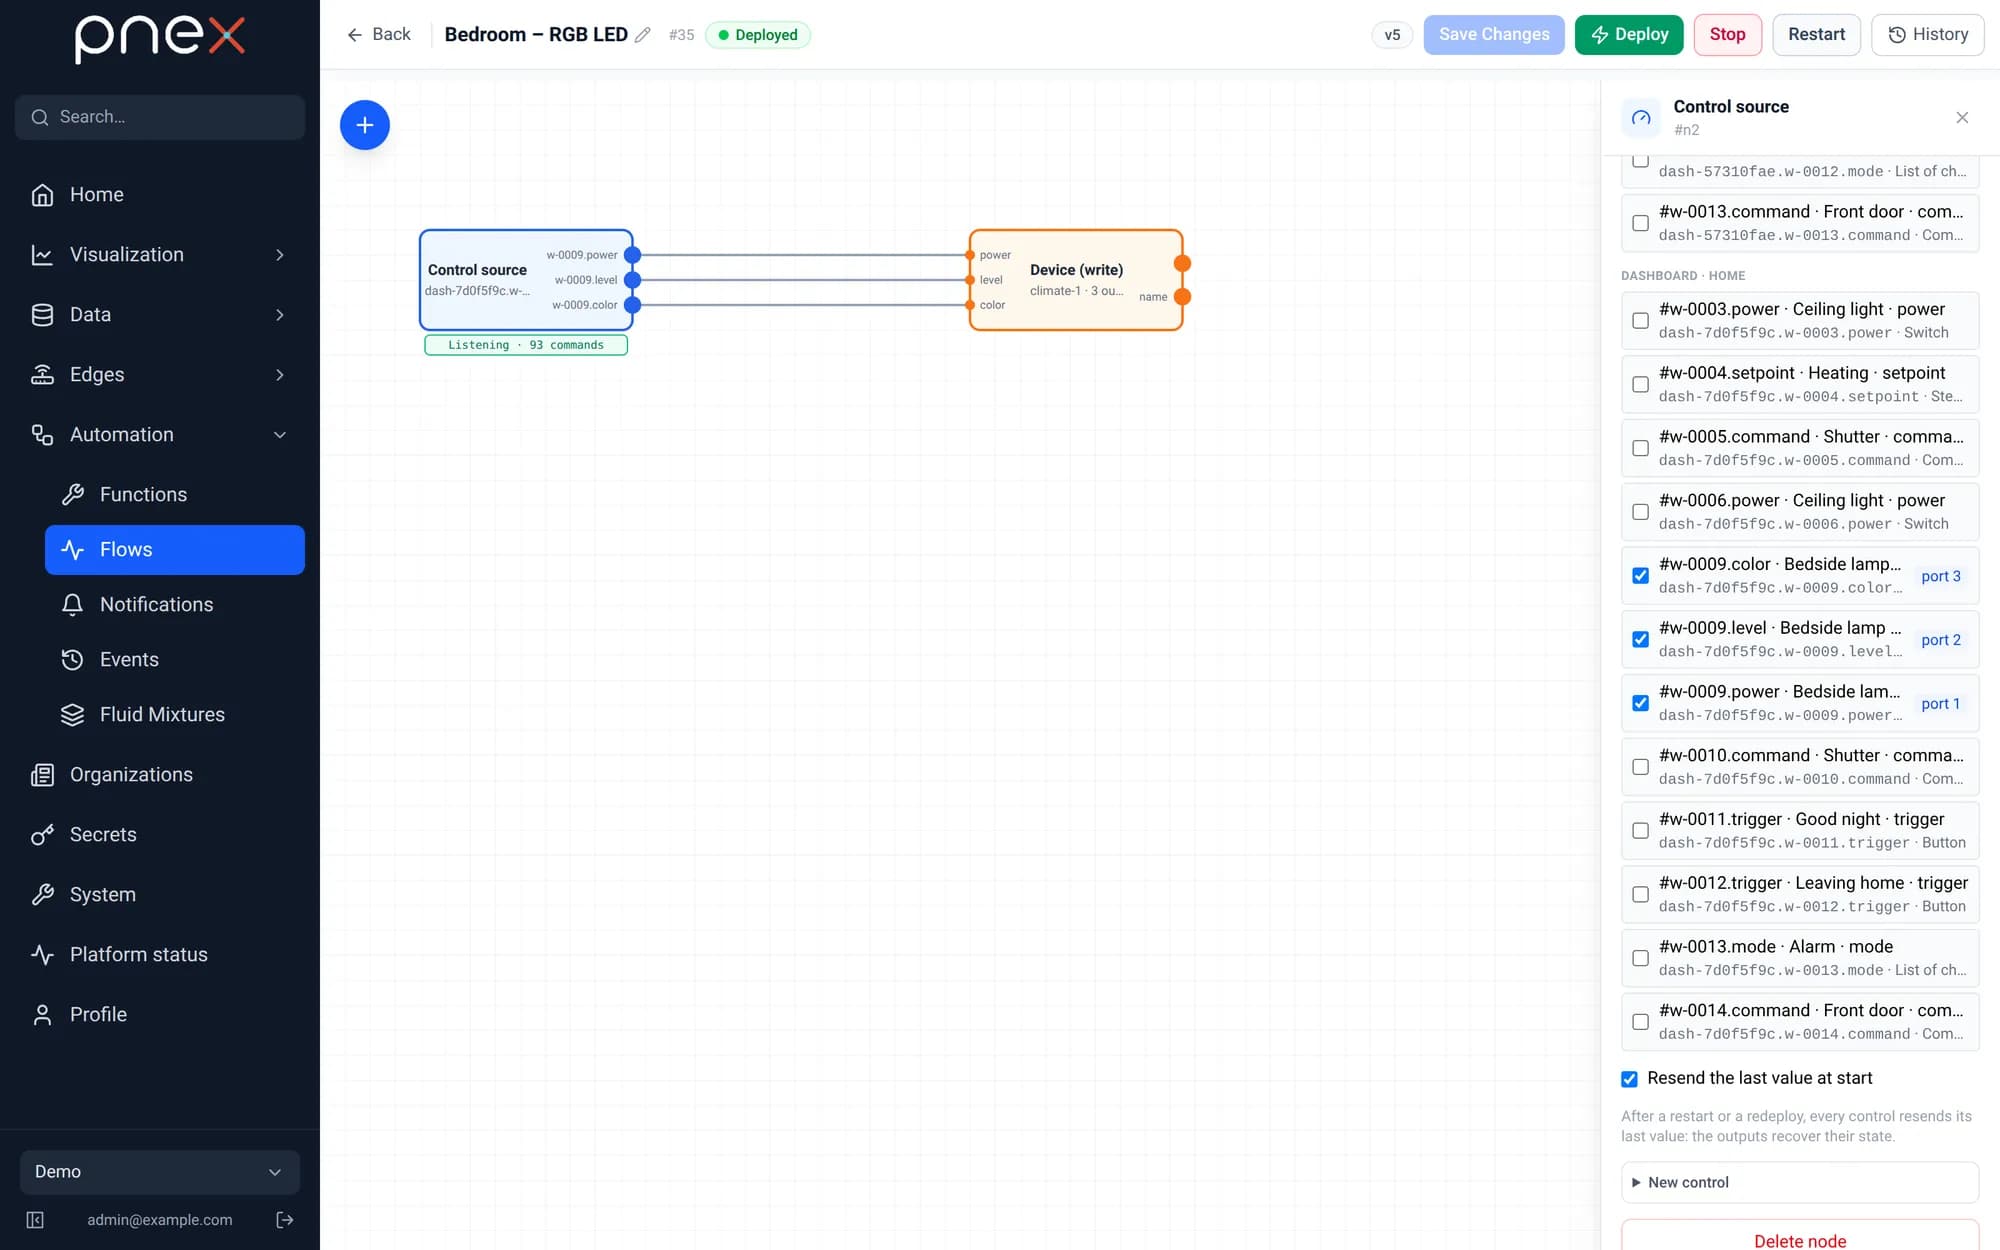
Open Automation → Flows → New flow and name it Bedroom – RGB LED.
- The new flow starts with an Inject node, which you do not need: the dashboard triggers this flow. Select it, then Delete node.
- Add a Control source node. Under Dashboard · Home, tick the three controls
of the Bedside lamp, in this order:
power,level,color. The node gets one output per control. - Tick Resend the last value at start.
Send them to the firmware
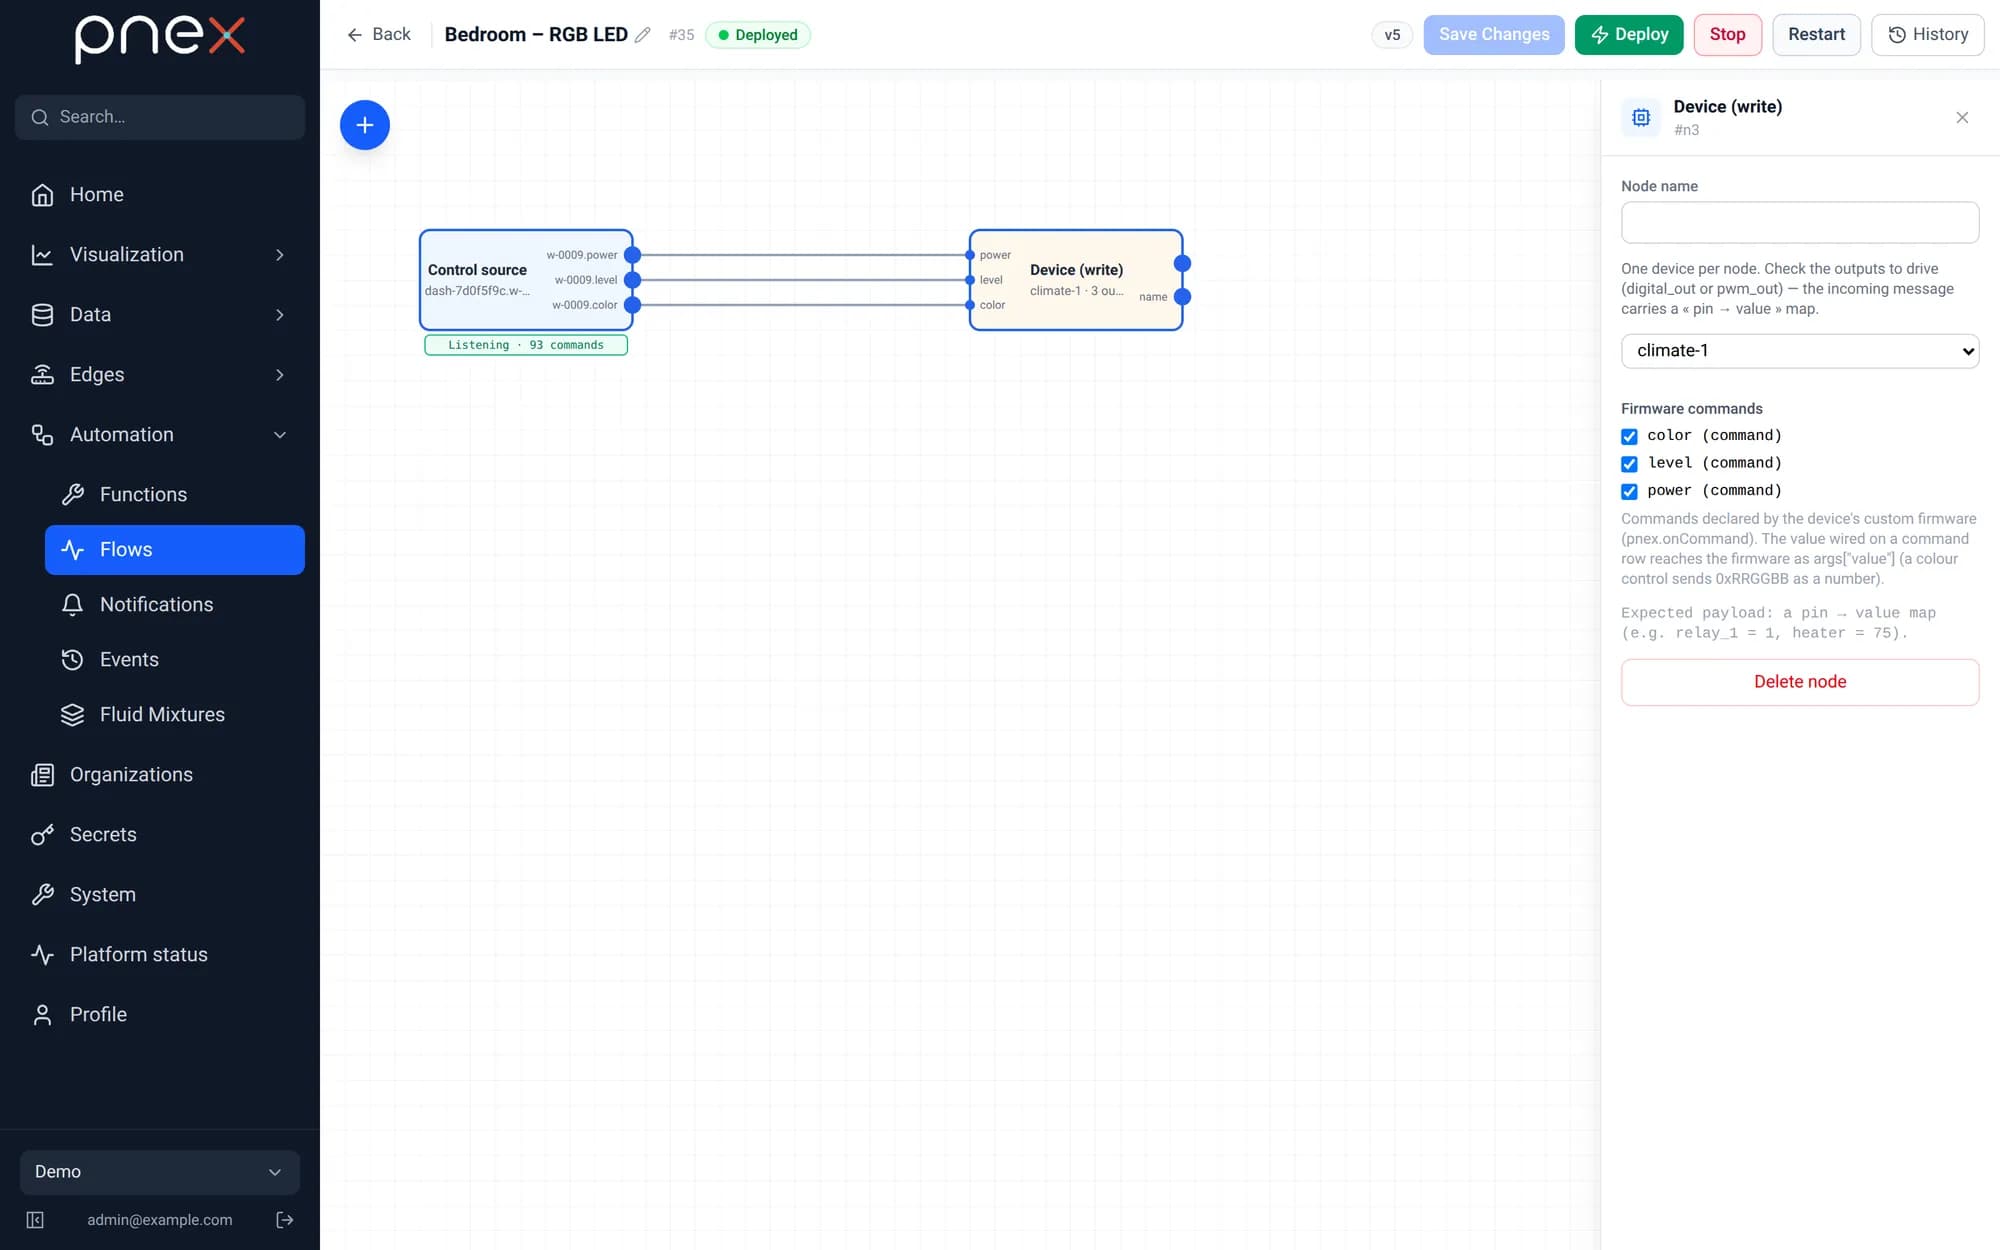
- Add a Device (write) node and pick
climate-1. Under Firmware commands, tickpower,levelandcolor: each gets an input row on the node. - Wire each output of the Control source to the row of the same name.
| From (Control source) | To (Device (write)) |
|---|---|
w-…power | power |
w-…level | level |
w-…color | color |
Deploy
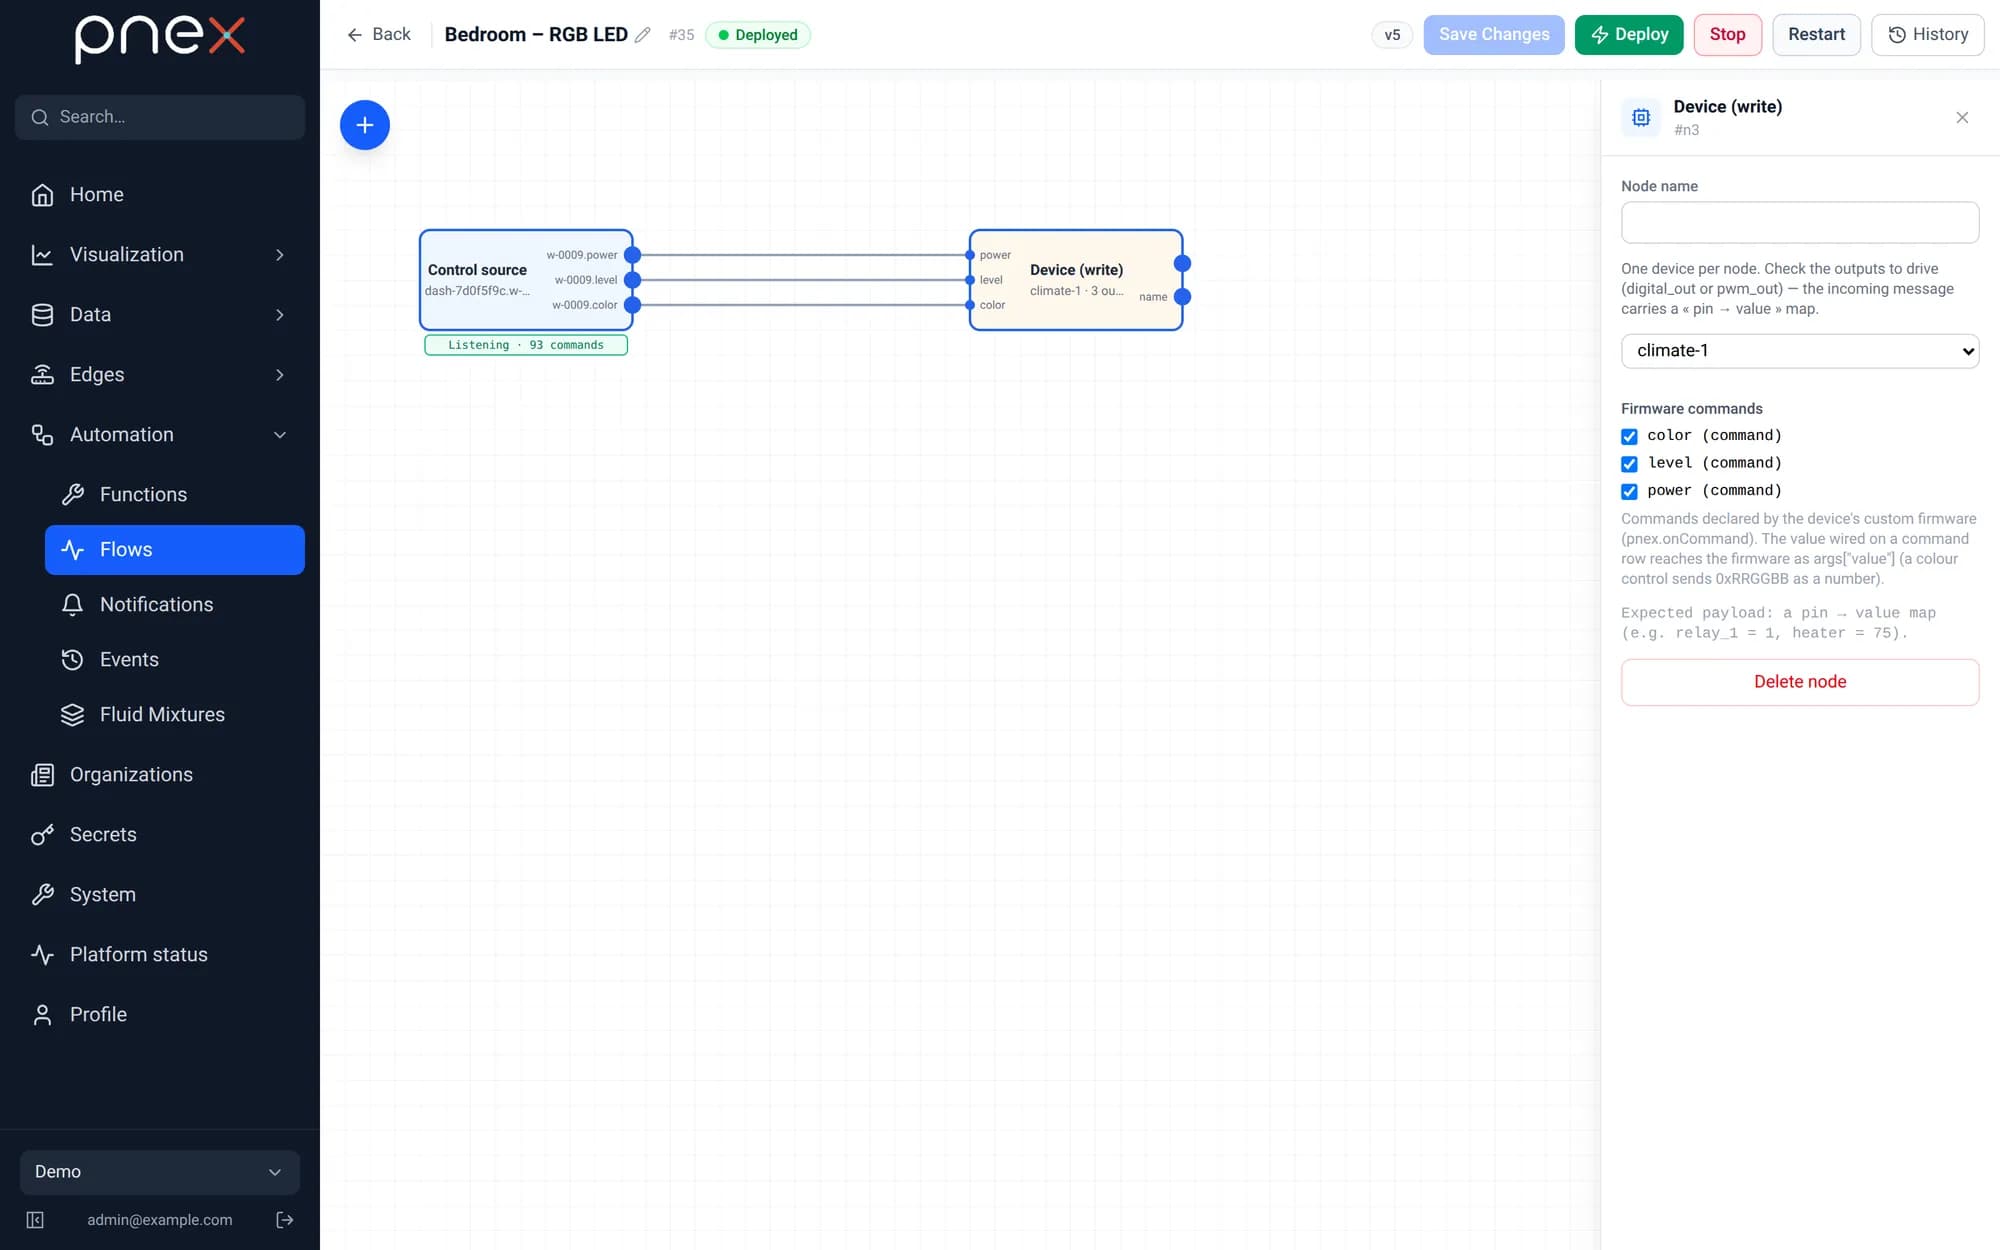
Click Save changes, then Deploy.
Light it from your phone
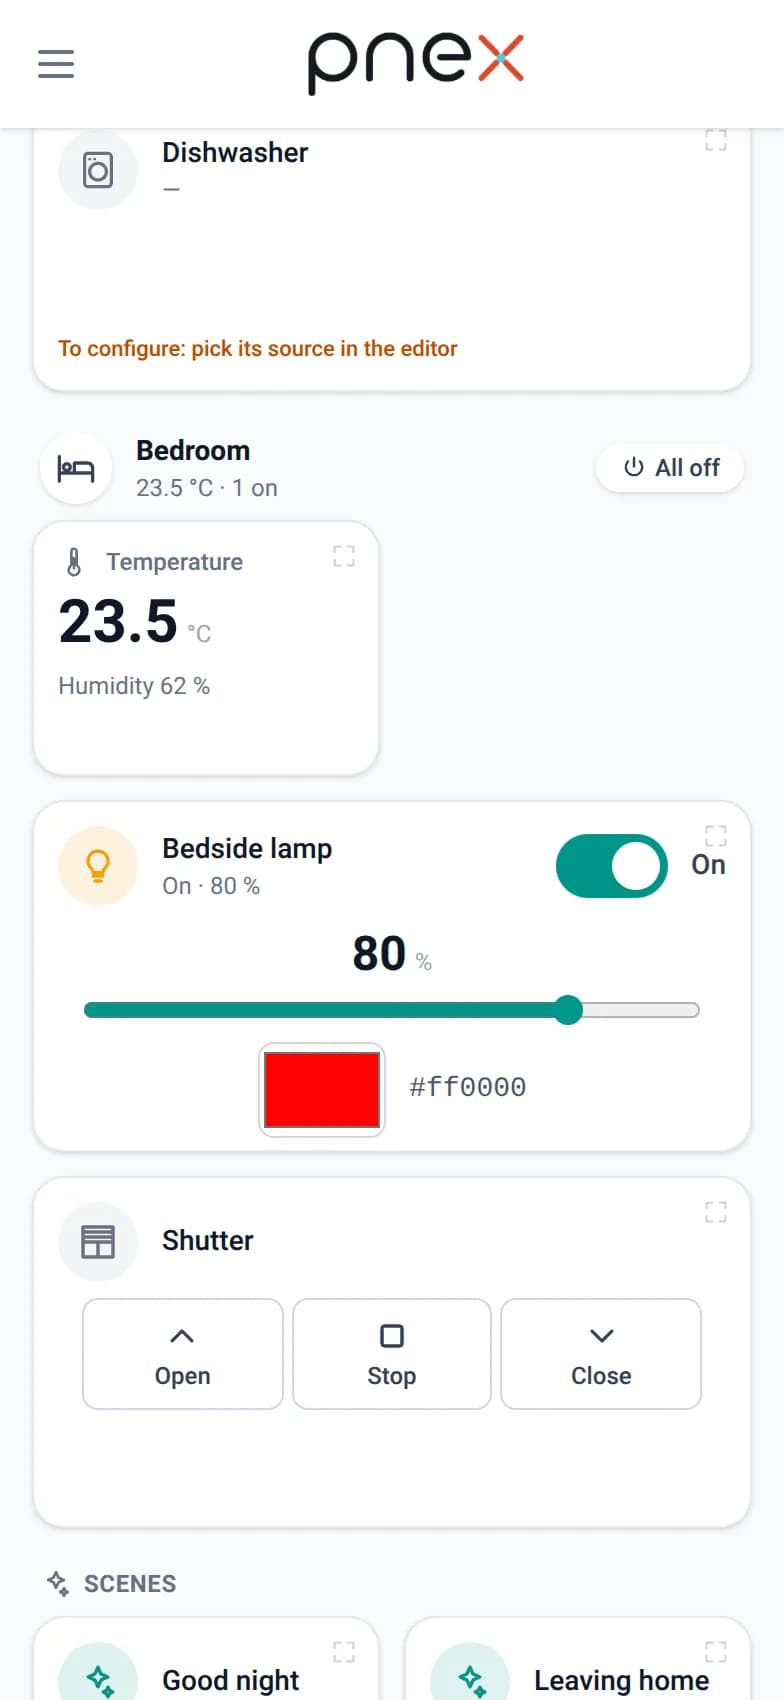
Open the Home dashboard on your phone. In the Bedroom:
- turn the Bedside lamp switch on: the LED lights up in white, and the room header shows "1 on";
- open Details and history (the corner icon) to change the brightness and pick a colour.
The board on the bench, driven from the dashboard: white, red, green, blue, cyan, brightness 20 → 60 → 100 %, orange, off.
Brightness and colour
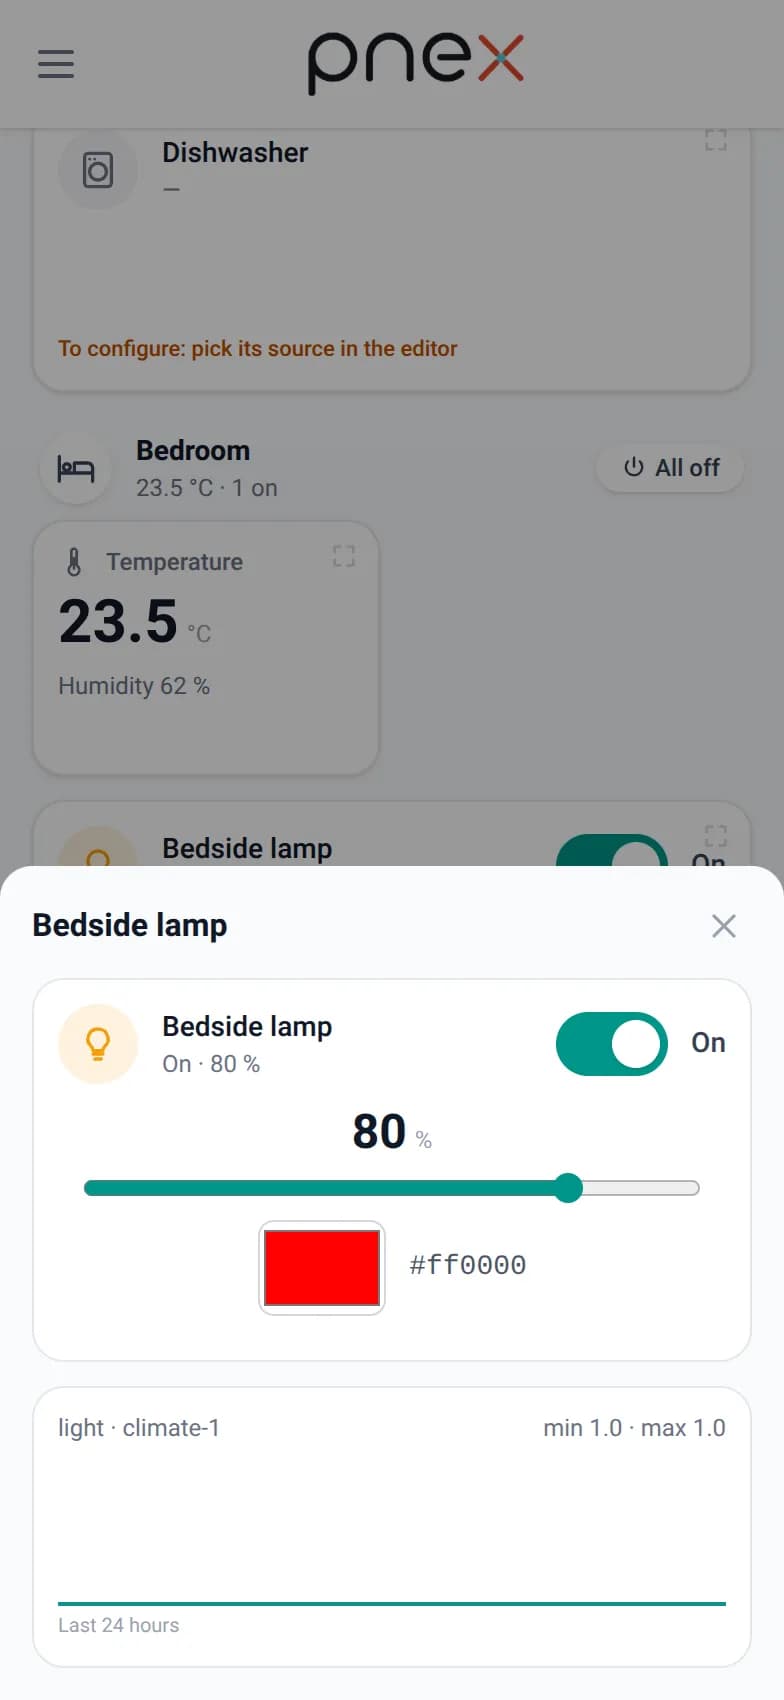
The sheet shows the lamp at full size: switch, brightness slider and colour, then the actual state reported by the board over the last 24 hours.
How it works
The flow does not know what an LED is. Device (write) sends each value to the command named by its input row, and your firmware decides what to do with it. The same flow could send the colour to several boards, or only after sunset: add nodes between the two.
Troubleshooting
| Symptom | Cause and fix |
|---|---|
| No Firmware commands in Device (write) | The board still runs the old firmware. Check Rebuild and Update over the air, then reopen the flow. |
| Red shows green (or the other way round) | Your LED uses another colour order. Replace LED_COLOR_ORDER_RGB with LED_COLOR_ORDER_GRB (most WS2812 strips), save, rebuild, update. |
| The card switches but the LED does nothing | Is the flow deployed? Open the flow's Debug: each press must show a message. A Device (write) error appears on the node. |
| The LED is off after the board restarted (power cut, update) | The board does not keep the light state across a restart. Press the card again. Resend the last value at start only covers a restart of the flow. |
| Create the flow… offers no pin for the colour | Expected: a colour is not a pin value. Pick the color command of the board. |
| The wires of the Control source all end on one row | Each wire must be dropped on its own row of Device (write). Drag it again from the output onto the right row, then deploy. |
Going further
- Turn the LED red when the room is too hot: in the alert flow of the
climate tutorial, send
16711680to thecolorcommand next to the notification. - Add an
effectcommand (blink, rainbow) handled inloop(), and a Select card to choose it.
Before you start
Prerequisites
Finish these tutorials first.
Parts & services
What this tutorial needs.
Boards
Tools
- 1×Chrome or Edge (Web Serial)Flashing from the browser needs Web Serial
Already covered by the prerequisites
- See a room's temperature on a dashboard
Waveshare ESP32-C6-Zero · AM2301 (DHT21) temperature & humidity sensor · Chrome or Edge (Web Serial)
- Temperature alerts with your own firmware
Raspberry Pi 5 (8 GB) / Raspberry Pi 4 (4 GB+) / Linux VM or server (Debian/Ubuntu) · Waveshare ESP32-C6-Zero · AM2301 (DHT21) temperature & humidity sensor · 10 kΩ resistor · Breadboard · Dupont jumper wires (F-F, M-F) · USB data cable (not charge-only) · 2.4 GHz Wi-Fi network · Chrome or Edge (Web Serial) · ntfy app on your phone